If you develop your software in groups, create a framework, or just want to show your latest development project to other people, your want documentation for your code. For Objective-C in Xcode projects there are solutions like HeaderDoc or AutoDoc, but the lack of solid documentation seems almost ironic. So I found doxygen, which has better documentation and supports multiple platforms, multiple programming languages, and multiple output formats.
Now, how do you generate the documentation automatically via Xcode? Here are the easy steps:
1. Format your header files for doxygen
To tell doxygen about your source code, you must add comments in your header files. The official description can be found here, but I will show you some basics:
#import <Foundation/Foundation.h>

/**
 * A utility class for the project.
 * Provides useful methods for the other classes.
 *
 * @author Oliver Eichhorn
 */

@interface Util : NSObject

/// An array containing DetailPeopleSection objects.
@property (nonatomic, strong) NSMutableArray *sections;

/**
 * Gets all the InfoContent strings with the given ID
 * from the given array.
 *
 * @param iid      the iid of the InfoContent object
 *                 in the infoContentArray
 * @param icArray  the array of InfoContent objects
 *                 to be searched
 *
 * @return an array with found InfoContent strings
 */
+(NSMutableArray*)getInfoContentStringsById:(int)iid
                  fromArray:(NSArray*)infoContentArray;
@end
In this example, you can see how to comment a class, a property, and a method. If you have used JavaDoc before, you will feel right at home.
2. Getting and setting up doxygen
You can download the lastest version here. The Mac version has a nice GUI which you can see in the screenshot.
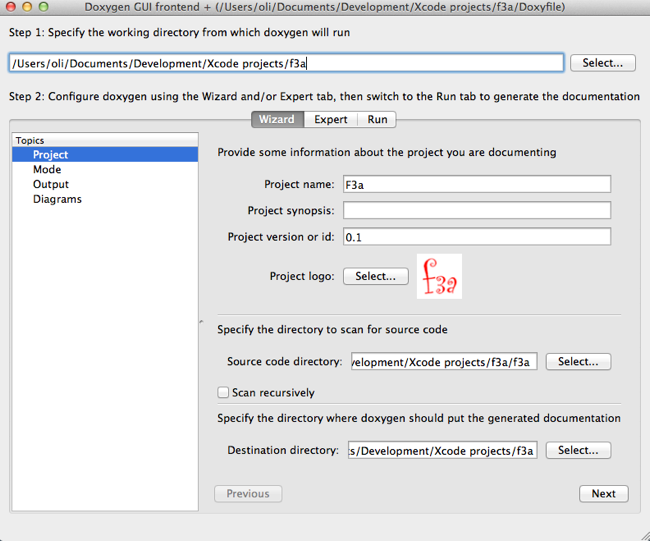
With this tool we can do two things: Generate the doxygen config file, and generate the documentation files for your source code.
First you should set the three paths: The “working directory” is the path where the doxygen config file will be generated. The “source code directory” is the path where your source code lies. Finally, the “destination directory” is the path where the documentation files will be generated. Separate directory for each format (e. g. “html”) will be generated here.
Furthermore you can configure the projects name, synopsis, and version.
In the topics “Mode”, “Output”, and “Diagrams” you can change more basic settings. In the “Expert” tab you can go crazy and configure every little detail of doxygen.
You can force doxygen to handle your source files as Objective-C files with EXTENSION_MAPPING in the “Expert” tab. Just enter the two entries “m=Objective-C” and “h=Objective-C”. I didn’t see differences in the resulting documentation, though.
If you are finished with the settings, you should save the config file in the “File” menu.
You could now go the the next step, but if you cannot wait to see the generated documentation, select the “Run” tab and click on “Run doxygen”. The documentation files will be generated in the destination directory.
3. Automatically call doxygen from Xcode
You could call the doxygen GUI every time you change the source code, but you don’t want to do that. In Xcode, there is an easy way to add doxygen to you build process:
In Xcode, select you project in the project navigator and select a target under “TARGETS”. Click on “Build Phases” and on the lower part of the screen select “Add Build Phase / Add Run Script”.
In the script field enter the following two lines:
/Applications/Doxygen.app/Contents/Resources/doxygen "$SOURCE_ROOT/Doxyfile"
exit 0
The string “/Applications/Doxygen.app/Contents/Resources/doxygen” is the doxygen command line tool, which is contained in the bundle of the doxygen GUI. If the GUI is installed at a different place, adjust accordingly.
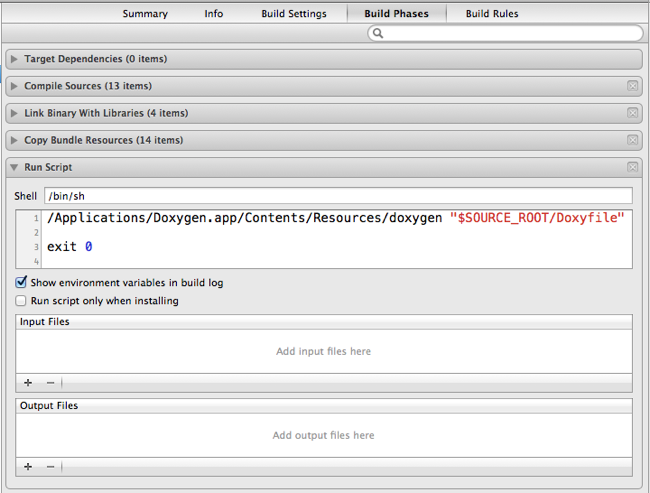
The string “$SOURCE_ROOT/Doxyfile” is the doxygen config file which we generated before in section 2. The environment variable SOURCE_ROOT is the root directory of your project. If your config file lies at a different directory, please adjust accordingly. You can also enter the absolute path. If there is a space in the path, you must use quotation marks like I did it in the example.
4. Generate the documentation
Now, every time your project is built in Xcode, the documentation files are generated or updated. Isn’t that nice?
Used sources:
- Duck Rowing: Documenting Objective-C with Doxygen Part I
- iphonepills: Tutorial XCode 4.0 Doxygen
- Doxygen: Doxygen manual